Tuesday, December 27, 2011

Cook Bacon in the Oven!!


Cook bacon in the oven! 

Place bacon in the pan. Set oven to 375 and cook for about 20 minutes. Ridges raise foods to keep them out of fats. Say bye-bye to greasy bacon! All the bacon is done at the same time and while the bacon is cooking in the oven or microwave, you are free to make the rest of breakfast! :)   


You can purchase one directly from me by contacting me through my website at www.pamperedchef.biz/akeel24

Saturday, December 17, 2011

Candy Cane Chocolate Hearts

Candy Cane Chocolate Hearts

Okay! So today I'm going to show you how to make these super cute candy cane chocolate hearts!! :) 

This is my very first tutorial so I think I'm a little more excited than I should be. I'm going to be giving these out to my daughters teachers at school, and some friends that are more like acquaintances.

The following recipe will make about 6 hearts for one bag of chocolate.


What you're going to need: 
  • 1 Box of Candy Canes
  • 1 Bag of Chocolate Chips 
  • 1 Bag of Hersey Chocolate Kisses (Candy Cane)
  • Sprinkles 
  • M&M's
  • Wax Paper
  • Disposable Cake Decorating Bags


  • You're going to lay a piece of wax paper down over your work place. You want to use the wax paper so that it's easy to peal the hearts up after they a finished drying.
  • Go ahead and peel the wrapping that's over the candy canes off. Try to make sure you're hands are dry so you don't end up getting sticky :).
  • Place the candy canes down on top of the wax paper and make a heart shape with them.


  • Now you're ready to melt your chocolate. Place the whole bag of Chocolate in a microwave safe bowl and microwave for 1 minute and 30 seconds.

After you take the chocolate  out of the microwave it may look like it hasn't melted but it has. Do not over melt your chocolate by microwaving it any longer than than 2 minutes.
  • Stir until all the chocolate has melted.
  • Place the chocolate into a decorating bag. You can cut the tip of the bag and use it with out a decorating tip or you can use one. Whatever you're comfortable with. I used a tip :)
  • Start filling the inside of your candy cane hearts. I went about 3/4 of the way to the top with my chocolate. 

  • Decorate by adding the crushed kisses, M&M's and Sprinkles
  •  And that's it! You're finished. Leave them out until they harden and then you can wrap them up as gifts or have them out at a party :) 


Hope you enjoyed! <3
Amanda

Saturday, December 10, 2011

S’more Than You Can Handle

S’more Than You Can Handle

See Original Post


Sometimes life gets too busy for dessert. You’re playing defense, offense, triangulating with co-workers and family members to keep the things moving with forward momentum and with as little conflict as possible, right? By the time you finish up all this life-playing, you’ll probably have enough time to catch a syndicated Seinfeld episode before falling asleep.
Wrong. You still have time for this s’mores bar recipe, which is  super easy and pretty much fail-proof. The only difficulty comes with the wait period in which the chocolate needs to set.
Oh, and Cocoa Pebbles is my secret ingredient to keep the chocolate portion from being too rich and give it a textural contrast.


 S’mores Bars


  • 2 cups graham crackers
  • 2 tablespoons sugar
  • 7 tablespoons butter melted.
  • 16 oz of dark chocolate (65% cacao), melted
  • 1 cup of whole milk
  • 2 cups of Cocoa Pebbles
  • 4 cups mini marshmallows, divided use
Instructions:
  1. Place graham crackers, sugar and melted butter in a bowl and mix to blend. Firmly press mixture into the bottom of an 11×13 pan and bake for 10-12 minutes at 350 degrees F. Set aside to cool.
  2. Melt chocolate with milk in a pan over medium low heat and whisk to combine. Transfer mixture to a new bowl and set aside for 10 minutes to cool (transferring the mixture to a new bowl will help to cool it faster).
  3. Add cocoa pebbles and 2 cups of marshmallows to cooled chocolate mixture and mix to combine. Pour mixture over crust. Pour remaining 2 cups mini marshmallows on top and place under the broiler for 2-3 minutes to toast tops of marshmallow layer. Transfer completed dessert to fridge and chill for at least 2-3 hours or overnight.
A few notes:
  • You can of course skip the cocoa pebbles. But we liked the extra crisp in the chocolate bite.
  • Keep a careful eye when toasting the marshmallow portion in the broiler, as the 2-3 minutes can fluctuate depending on your broiler set up. We recommend you check it after the first minute.
  • For nice clean slices, wash or wipe knife off between cuts.

Thursday, December 8, 2011


Oreo Snowman Pops

Had to share this blog from The Idea Room

I actually plan on making these, and will be passing them out as office/coworker gifts!

Photobucket
Simply take some Double Stuff Oreos (or Oreo Cakesters) and insert a popsicle or sucker stick into the frosting in the middle of the Oreo. Melt some white chocolate. I used white CandiQuik which can be found in the baking supply area of your grocery store. It melts very quickly and covers very nicely.
Then set them to dry on some wax paper. Add mini chocolate chips for the eyes and the mouth. Add a candy corn for the nose. That’s it. If needed, you can trim the edges of the chocolate with some kitchen scissors to make a nice smooth edge.
Photobucket
Then, since I had some leftover melted CandiQuik, I made some fun melted snowmen. Pretty much using the same process. Just pour a puddle of CandiQuik onto the wax paper and then place a dipped oreo on the puddle. Make the eyes, mouth and nose with the mini chocolate chips and a candy corn. This time you can add a scarf using a piece of licorice, some buttons (more mini chocolate chips) and some arms using a pretzel stick broken in half.
Photobucket
These would be a fun little gift or a fun party treat! They taste pretty darn good too! Hope you enjoy them!

Santa Hat Party Mix


This past weekend my husband and I got together with some friends and had a game night.
Game nights are fun, aren’t they?
Aren’t they?
Well, they are supposed to be fun.
Until…
Men vs. Women.
Apparently as a married adult it gets all kindergarten on game nights.
When you are in elementary school it’s always boys vs. girls.
The sexes seem to come together in the mid teens through your twenties when you are wearing love goggles and you play “couples”.
After you have been married for a while, you squeegee the steam off the goggles and it’s all boys vs. girls again.
It all seems like good fun when the games start.
Then, slowly but surely, the tide starts to turn.
It would be remiss of me not to mention that I was on the losing side of the tide.
Sometimes it happens like that.
It would also be remiss of me not to tell you that this was a rematch.
We have lost before.
Losing is not so much fun.
Especially when you were the ones that called for the rematch.
We just knew that the first loss was a…fluke, if you will.
An isolated incident.
Apparently not.
We lost again…at the rematch.
*hangs head in shame*
There has been fist pumping, high fiving, booyah yelling, boastful texting, congratulatory emailing, and smack talking that we, as women, have been fairly gracious about.
I am waiting for the T-shirts to get printed up.
Ok, I’m a little bitter.
I have surmised that we need to choose another game.
Next week it’s on!
So, if you’re having your own game night or going to some friends…even if you lose, you will be a winner if you bring this fun Party mix!
See, I try to look on the bright side ;)
What makes this mix fun is the addition of the Santa hats.  I mean Bugle Santa Hats?  Why has no one thought of this sooner?
So, let’s start there.
I found these yummy Bugles at the store.  They called Caramel Bugles and they boast the sweet and salty.
You could certainly use the regular Bugles, though.
What I found was so great about the caramel bugles, besides being incredible delicious and addictive was that they are coated in a sweet glaze which makes them a bit thicker and less fragile than regular Bugles…so keep that in mind.
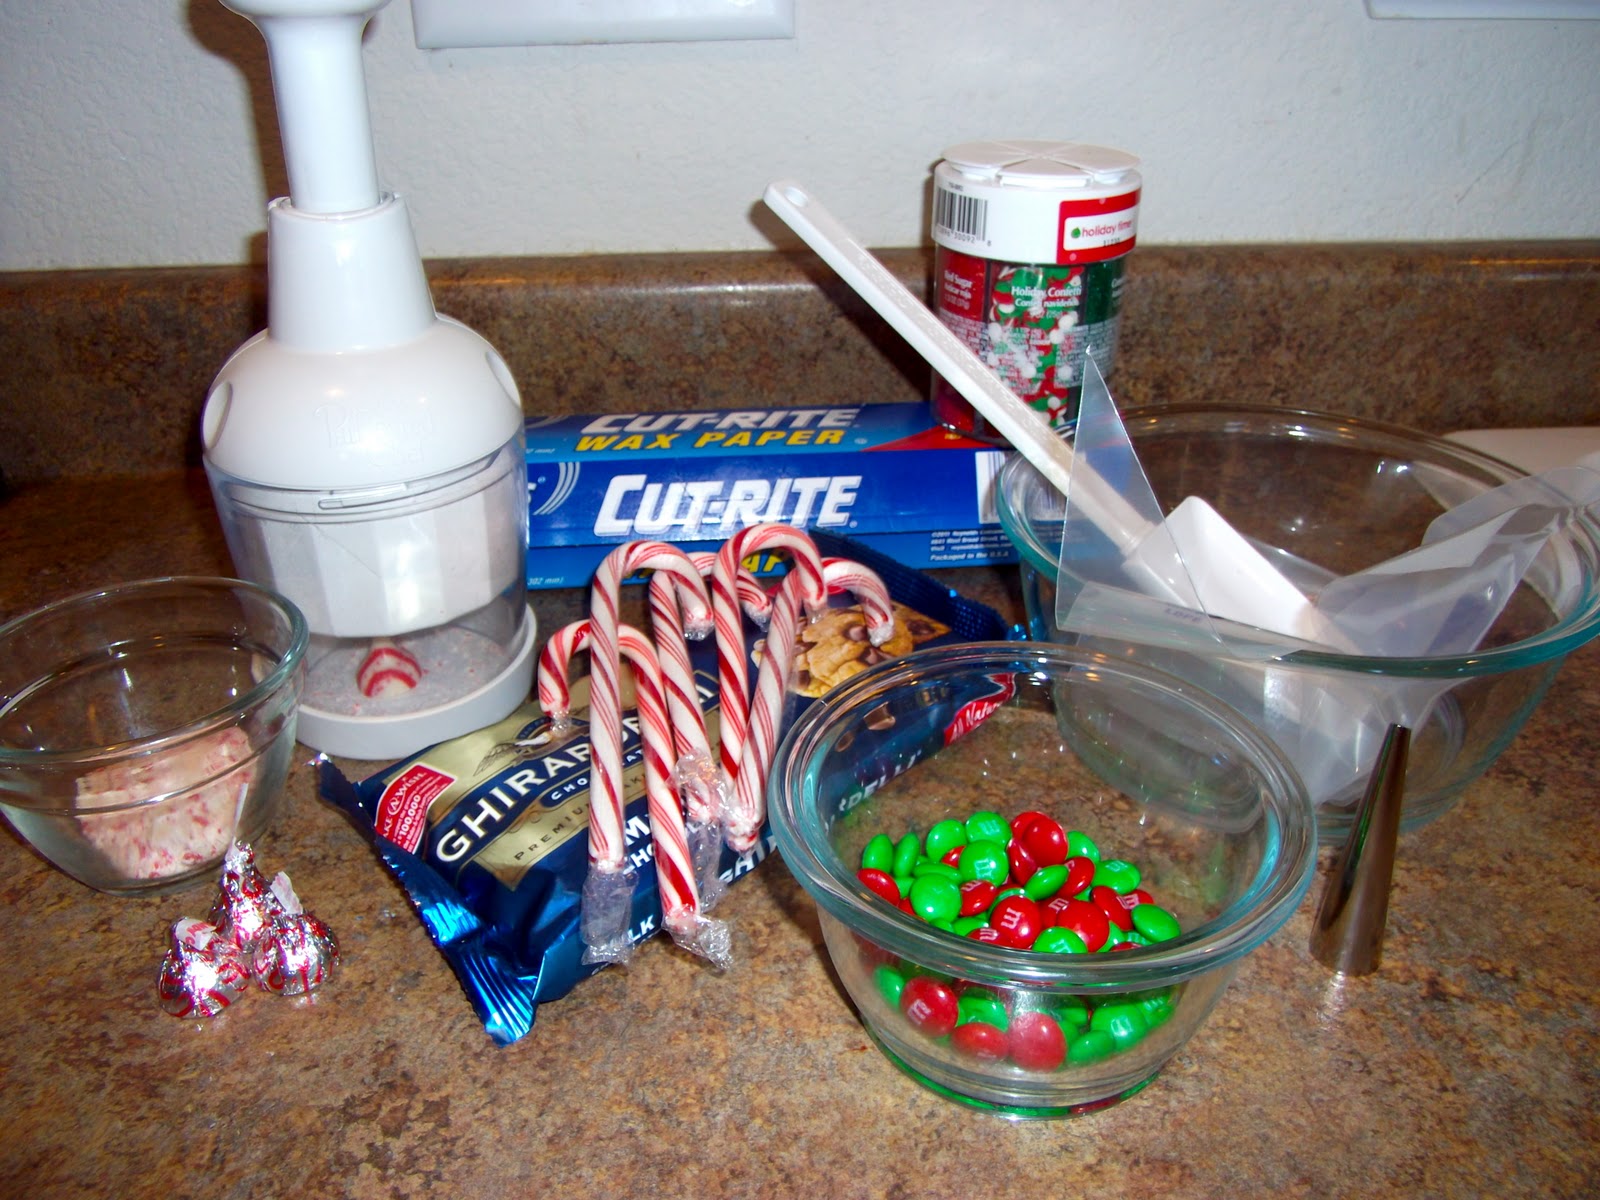
Here’s what you’ll need…
Bugles
Red Melting disks
Mini marshmallows
White sprinkles (I used nonpareils)
Melt the candy melts, along with a tablespoon of shortening (to help thin the melted candy), in 30 second intervals on half power in your microwave until melted.
Immediately start dipping.
 
 Let them set up for 10 minutes or so on parchment or wax paper.
When they are set, remelt the red candy disk (if necessary) and dip just the bottoms (the large part of the Bugle) into the white sprinkles.
Then flip it over and dip the top in the melted candy and press a mini marshmallow on top.
And voila…Bugle Santa Hats!
If you want to use the hats as an addition to a mix here’s an idea for a sweet and salty mix that’s easy and yummy.
Feel free to play around with the additions and make it your own!
3 cups mini pretzels
1/2 cup craisins
1 cup salted dry roasted peanuts
2 cups Rice Chex
2 cups holiday colored M&M’s
8 oz. white chocolate for melting
Spread all your ingredients, EXCEPT M&M’s, out on a baking sheet lined with parchment or wax paper.
Melt your white chocolate according to package directions and drizzle over the pretzel mix.
Transfer into a large bowl and coat mix with chocolate.
Return to baking sheet to allow to dry.
When chocolate is set, sprinkle M&M’s and Bugle Santa Hats over the mix.
Transfer to big bowl to serve.
or put in jars to give to your friends…
…or use as a peace offering when your game night doesn’t go as planned ;)
Hope your December is off to a great start!

Bacon, Egg, and Toast Cups!


Bacon, Egg, and Toast Cups

Try cooked, crumbled sausage in place of bacon or make a vegetarian version with sauteed spinach. Dress things up with a sprinkle of Parmesan cheese.
Everyday Food, September 2010
  • Prep Time 15 minutes
  • Total Time 35 minutes
  • Yield Makes 6

Ingredients
  • 3 tablespoons unsalted butter, melted
  • 8 slices white or whole-wheat sandwich bread
  • 6 slices bacon
  • 6 large eggs
  • Coarse salt and ground pepper
Directions
  1. Preheat oven to 375 degrees. Lightly butter 6 standard muffin cups. With a rolling pin, flatten bread slices slightly and, with a 4 1/4-inch cookie cutter, cut into 8 rounds. Cut each round in half, then press 2 halves into each muffin cup, overlapping slightly and making sure bread comes up to edge of cup. Use extra bread to patch any gaps. Brush bread with remaining butter.
  2. In a large skillet, cook bacon over medium, until almost crisp, 4 minutes, flipping once. (It will continue to cook in the oven.) Lay 1 bacon slice in each bread cup and crack an egg over each. Season with salt and pepper. Bake until egg whites are just set, 20 to 25 minutes. Run a small knife around cups to loosen toasts. Serve immediately. 

Glorious Treats

Cookie Decorating Tips... So Adorable!! I found this off of Glorious Treats!


Pink and Purple Penguin Cookies


In preparation for my recent Pink and Purple Penguin Party, I spent a day making some cute penguin cookies.  I wanted them to be simple, playful and girly, and I love how they came together!  Once I had the base design I had lots of fun adding hats, scarfs and ear muffs to give each penguin a little personality.  This general design could be done in any number of color schemes to create cookies for boys or girls.  Swapping the purple or pink background for light blue, then adding details in red and green would make adorable traditional Christmas cookies! 

Let's decorate cookies!

First, bake a batch of cookies using my Sugar Cookie recipe (this can be done 1-3 days before you decorate them).
Then, the day you plan to decorate, prepare one (or more) batches of Royal Icing

For the cookies below I made icing in...
black (1 bag of medium consistency)
white (1 bag of medium consistency, one thick/detail consistency) 
purple (1 bag of medium/flood, one thick/detail)
pink (1 bag of medium/flood, one thick/detail)
orange (1 small bag- thick/detail)


~How to decorate simple penguin cookies ~

1. Outline and fill in your cookie with the background color (in this case purple), allow to set a minimum of 2 hours, longer in humid climates.
2.  When the base layer is set, use black icing to create the outline of the penguin, as shown.  Allow to set 1-2 hours.
3.  Fill in the body of the penguin with white icing (as shown).  Allow to fully dry (6-8 hours).  When the body is dry, add eyes, and a beak.  If desired add a little "blush" to the cheeks (shown below), by lightly applying pink luster dust with a small, dry paint brush.


Now it's time to dress your penguins! 

You can have fun with any combination of bows, scarfs, hats or ear muffs, and I'm sure you can think of even more ideas!  Add white "snow" to the background by either adding simple dots, piping simple snowflakes, or adding snowflake shaped sprinkles. 

Here are a few of my little penguin friends...


For beautiful winter assortment, add snowflake cookies, and some simple snowball cookies.


Happy penguin decorating!

For more penguin fun, be sure to check out the full Pink and Purple Penguin Party!

(Top photo by Gene Chutka, for Glorious Treats)

Wednesday, December 7, 2011

Simple, festive, garnishes anyone can do!


Easy garnishes can make any dish extraordinary!

Our products make it easy to serve dishes that are decked out for celebrations!
  • Adorn dessert dishes with chocolate curls. Place two thick squares of baking chocolate on a piece of Parchment Paper. Microwave on HIGH 10 seconds. Using Vegetable Peeler, create curls from softened chocolate.
  • For an elegant spread, soften butter at room temperature and stir in your favorite rub or seasoning mix. Attach open star tip to Easy Accent® Decorator and pipe rosettes onto guests' bread plates.
  • Bedeck your beverages with citrus fruit. Our Simple Slicer makes perfect orange, lemon or lime slices. Slide them over the rim of your drink glasses at your next holiday get-together.

Tuesday, December 6, 2011

Apples and Caramel Dip

Has anyone seen those pre-packaged apples and dip things they sell at Wal-Mart? I noticed that they have began to become popular at drive-thrus as an alternative option for fries. Anyway we did this long car trip and I ended up trying one of apples from the package...  I dont know if it's just me, and I guess I cant complain too much,  because I would much rather Addy eat apples over fries any day, but they tasted pretty nasty to me.

Anyway, it got me thinking about having that snack in the house for my daughter. I love apples and caramel sauce but trying to make the sauce sucks, and cutting the apples is such a pain! I always have a hard time holding the apple just right, and have a ton of mental images of me accidentally cutting my whole hand off...yeah... potatoes are an even more epic battle.

Amazingly, The Pampered Chef has made this nifty little thing called the "Apple Wedger".  It cuts 10 perfectly even apple slices, and takes less than 5 seconds to do. Easy and the thing that I love most, is that I no longer worry about the hand cutting off thing. ;)

You can buy the 6 pack of Marzetti Carmel Dips and be done. No nasty taste from the pre packaged ones and you can even buy the "no-fat" ones for yourself.


I'm curious... for those of you who have the Wedger, what else have you made with it?